Menu

Welcome to the SiteBlocks Site Builder

HELP CENTER

Blog posts : "General"

Website Statistics

Statistics Overview


This area will allow you to take a look at the visitor statistics for your website in detail via our collected server-side data. Please note that this will not track any activity while you are logged into your account - these are strictly external page statistics.

The information you see when first visiting this area is the Overview section displaying Page Views and Site Visits. Page Views display the number of times individual pages have been viewed. Site Visits report how many times people have viewed your website.


To view your statistics, go to 'SITE' > 'Statistics' in your SiteBlocks editor.


Go Back

Responsive Viewing


When creating a website with SiteBlocks, we make sure that your content is already responsive and dynamic so that your viewers can access your pages on a variety of device types with ease. If you would like to preview how your website looks on different devices, you can use the Viewer.


Where to Find


To enter responsive viewing, click the “VIEWER” on the main left toolbar. The top right buttons allow you to preview pages in different device modes.


If you would like to exit the responsive Viewer, simply click the blue “Show Editor” button to return to editing your website.


Different Screen Sizes


A responsive website (such as your SiteBlocks website) will intelligently adjust the your website content and layouts based on your device type, screen size and orientation. For example, when viewing a website using your smartphone, you may have noticed in the past that the website looks different on your small device with larger menus and the content adjusted to the size of your screen. If you visited that same website on your home computer, the layout may appear differently if the website was responsive.

Previewing your website using the Responsive Viewing mode can give you an insight on how your website will appear on a different device without having to actually access your website on a different device.


The responsive viewer will allow you to view your website from the following device options:
  • Desktop Mode
  • Portrait Tablet Mode
  • Landscape Tablet Mode
  • Portrait Smartphone Mode
  • Landscape Smartphone Mode


Editing Content for Responsive Screens


You can choose which elements will appear on certain device types. By default, SiteBlocks ensures your content is already dynamic and responsive, allowing your elements to appear on computers, tablets, and smartphones. If you would like to disable an element on a certain device type, this can be achieved by simply clicking the device type in the Element Toolbar. Simply hover your mouse over the element to access the Element Toolbar, from here you can enable/disable viewing on a computer, tablet, or smartphone by clicking on the corresponding icon located at the bottom.


Create "Mobile Only" and "Desktop Only" Versions of your Elements and Blocks


If you would like certain content to only appear on mobile devices or desktops, you can do so by controlling their visibility by disabling the element on specific device types.

To create mobile-only content, simply disable the content on other devices by clicking the monitor icon and/or tablet icon.


Then, you can create a desktop-only version of that content directly above or below the mobile-only block or element. Simply disable the desktop-only content on smartphones and tablets.


Go Back

Decide who can view specific pages on your website by adding a password to your page. Locked pages will be hidden until the correct password is entered. You will also be able to view the locked page when you are editing your website.


Locking a Page


In order to lock a page, you must set a password by going to 'Pages' > Cogwheel Icon > 'Set Password'.


Unlocking a Page


Unlock a page by removing the password. Go to 'Pages' > Cogwheel Icon > 'Remove Password' > 'Save Changes'.


Changing a Password


If you forget what the password is, or if you simply wish to change the password, you will need to reset it by removing the old password. To do so, go to 'Pages' > 'Cogwheel Icon' > 'Remove Password', then you will be prompted with a form to enter a new password, enter the new password you wish to use, and then click 'Save Changes'.

Go Back


RSS is a way for you to publish notifications of new blog entries. When your visitors subscribe to these feeds, they can read the new blog content in an RSS reader application. This is a great way to improve reader engagement and loyalty.

The XML file automatically syndicates new content through the above feeds in a standard format that displays in any RSS reader. 


NOTE: As of 2019 Firefox has discontinued built-in support for RSS readers. You may need to use Mozilla Thunderbird or an alternative browser to use an RSS feed extension.


Share your RSS Feeds


Your RSS Feed links for your blog are located in the Blog Settings found by going to "POSTS" > "Blog Posts" > "RSS". Under the General category, you will find links to your Blog's most recent posts or comments. You can also share specific feeds based on the category your posts were assigned to by sharing the specific links found under the Categories section.

To subscribe to an RSS feed, simply copy the RSS feed link and add it to a third-party RSS plug-in.

To share your RSS feed, you can create a Button and add your RSS feed link as the button link. If your visitor has an RSS reader, this should prompt the third-party RSS reader to subscribe to your blog feed.


Go Back

Managing Redirects

Redirecting A Subdomain To A Custom Domain


Create a site-wide 301 redirect to redirect from one host to another. This can be useful if you want to redirect from your subdomain to a custom domain. To get started navigate to "SITE" > "SEO" > "Redirect" found in the main toolbar. Please note that this will take effect once you log out of your SiteBlocks website.


Select your domains from the following drop-down menus found under the "Redirect" tab in the SEO Manager:

Redirect from: Select the domain you would like to redirect from. When people visit this domain, it will direct them to the destination domain.

Redirect to: This is the domain you would like to redirect to. This is the website people will see in the address bar when vising that website.


Removing Redirects


Note that redirects from "SITE" > "SEO" > "Redirect"  are permanent 301 redirects. This is a special type of redirect that is designed for long-term redirects. If you would like to remove this redirect, you still can with a few extra considerations.

To remove your redirect, clear the "Redirect to" and "Redirect from" fields by selecting the blank fields at the top of the drop-down list.

Please note that this change will not take effect until you log out of your browser. If the redirect is still in effect, you may need to clear your cache in your browser.


Renaming A Page With Redirects


If you are renaming a page on your website, it might be a good idea to add a page redirect. This way, if any of your visitors can still see your page if they try to access the old page address.

To rename your page, go to "PAGES" > Click the cogwheel icon next to your page > "Settings" to access the Page Settings Menu. You can rename your page without altering the URL by only editing the Page Title.


If you would like to update your page URL, you can alter the Page URL field to your new page name. Once you alter this field, an option will appear to "Redirect your old page", once you select this option your redirect will be put into place.


Setting your Default Home Page


You can change which page will be the first page your visitors see without setting any redirects. To achieve this, you can simply update the Default Home Page. To learn more about this please see our article on Changing Your Default Homepage.


Go Back

In order for your website to appear in search results, it will need to be indexed first. This is accomplished through the use of an XML sitemap. A sitemap is a file that provides a 'road map' of all of the important pages in your website to ensure that Google will discover them when crawling the web.

Here at SiteBlocks, we automatically create a sitemap of your webpages and it is enabled by default. Over time, popular search engines such as Google will eventually locate and index your website using this sitemap. If you'd prefer not to wait, you can try submitting your website's sitemap manually by visiting the Google Search Console:

https://search.google.com/search-console/about


Once you claim your domain or website as property on the Google Search Console, you will be able to submit your sitemap URL through the Sitemap tab:


We also encourage you to check that your Sitemap in the Website Settings section of the editor is enabled (it is by default). For more information about managing your sitemap and how to access it, your can read our wiki article about Your Sitemap.

If you would like to create your own custom sitemap, you can learn more about writing sitemaps from the following support wiki by Google:

https://developers.google.com/search/docs/advanced/sitemaps/build-sitemap


Go Back


Alt text acts as an "invisible" description of your image that can only be seen when viewing the source code of your website. Adding alt text to your images is not only helpful to increase accessibility (as this will help with the readability of your website on screen-readers) but it is also hopeful to improve your website's SEO. This is because alt text will inform the search engine what your image is about so it can appear in related searches.


How To Add Alt Text to Images on Your Website


Once you have added your image in an Image Element to your page and have selected your image, you are ready to create your alt text!

Simply double click on the image to open the image editor, from here you can visit the Alt Text tab. We recommend creating alt text that is both specific and brief.

Note: For more information on how to add an Image Element, please see our Image Element wiki article.


Go Back

Site Wide SEO


Search engine optimization (SEO) is the process of improving the quality and quantity of website traffic to a website or a web page from search engines. If you would like your website to become more easily discoverable on the web, it is a good idea to work on improving your SEO.

We provide an easy place to manage your website's SEO settings. The SEO Manager is a one-stop place to edit your meta information, site map configuration, Google Analytics, and more. Visit the Site Wide SEO manager from the Main Toolbar by going to SITE and then select SEO from the sub-menu to manage your settings.


Meta Tags


Meta tags tell search engines important info about your website, including how it should be displayed in search results and how to display it to visitors.

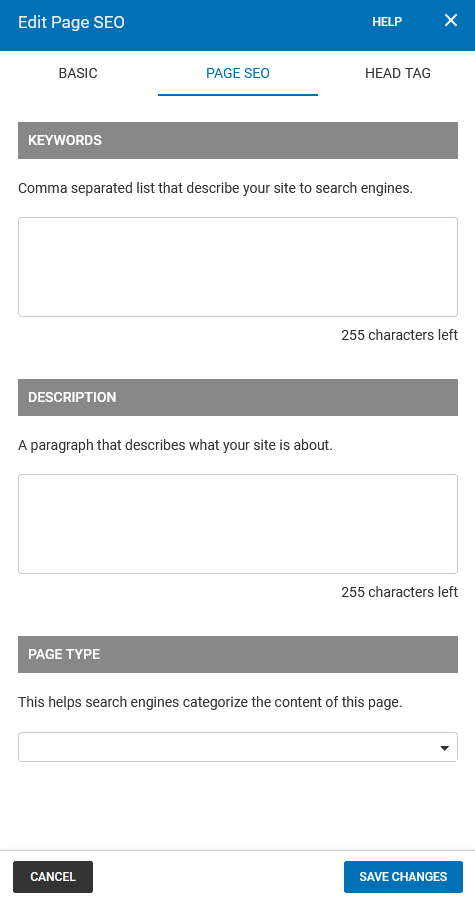
Most search engines will use the description for a summary in their search results. Please note that the meta tag information added here will be sitewide! To add meta tags specific to one of your pages, please set them in the Page SEO area under the Page Settings section of the toolbar.

Please note that the meta tag information added here will be sitewide! To add meta tags specific to one of your pages, please set them in the Page SEO found in PAGES > Edit A Page > SEO.


Robots (robots.txt)


Adding a robots.txt file is a great way to tell website crawlers which pages should be crawled, and which ones shouldn't. This can also be a good method to avoid overloading your website with requests.

For more information, please see Google's official page regarding robot.txt:

https://developers.google.com/search/docs/advanced/robots/create-robots-txt
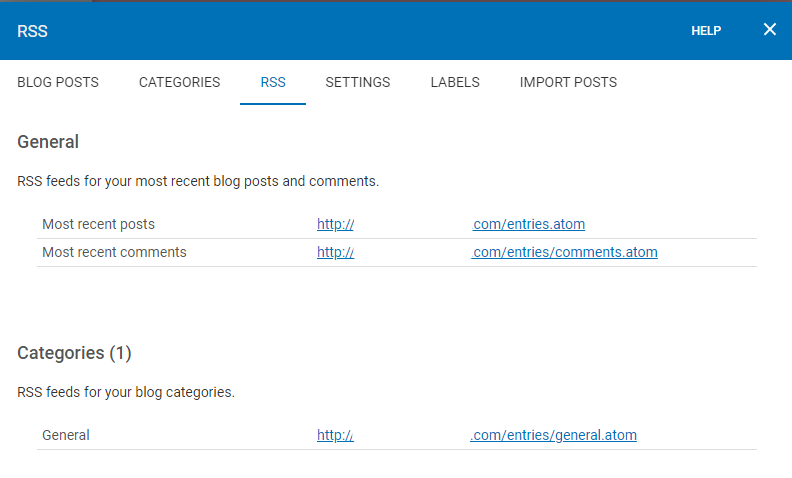


Sitemap


While your SiteBlocks website will eventually be indexed by Google, an XML Sitemap can improve the crawling of larger or more complex sites. By default, SiteBlocks offers a built-in and ready-to-go sitemap for your website that will include all pages in the navigation. You can select from different indexing options including all pages or you can select "custom sitemap" to submit your own custom sitemap.


Redirects


You can redirect from one host to another, this will take effect when logged out of the builder. This is useful if you want visitors to be redirected from your subdomain to your custom domain.


www Redirects - Choose from "No www redirect", "Redirect from www version (recommended)" and "Redirect to www version"


Choose from "No www redirect": This will allow your visitors to access both the www. and non www. versions of your website.
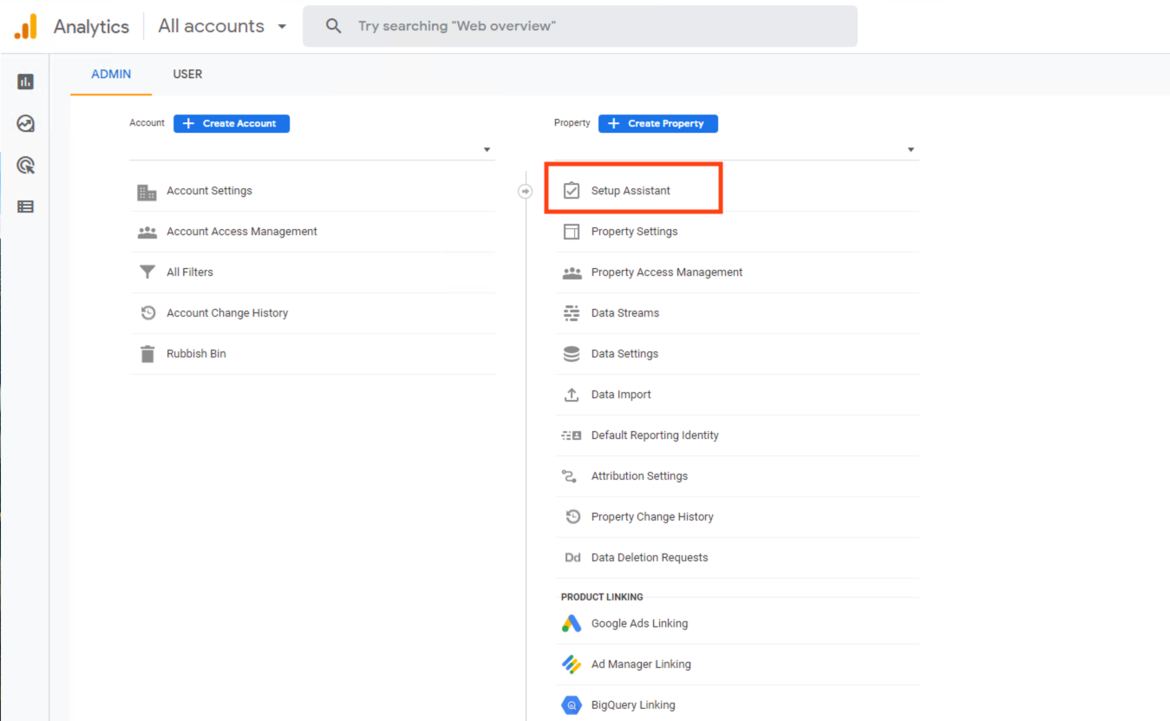


Google Analytics


Google Analytics is a great tool to track your website traffic and gain measure customer engagement. Google Analytics can be quickly added to your builder site once you have registered. If you have not registered for this service, please visit the Google Analytics page. Once you have signed up, you will be guided through a short process, after which you should be ready to use this service with your website.


Adding A Universal Analytics Tracking ID (UA-XXXXX-YY): From your Sitewide SEO Manager under the Google Analytics tab, you can paste your Universal Google Analytics ID (UA-XXXXX-YY). To find this menu, simply visit your main toolbar and select SITE > Sitewide SEO > Google Analytics.


Adding A Google Analytics 4 Tracking ID (G-XXXXXXX): Google has recently released its "Google Analytics 4" tracking. Along with this update, the Google Analytics 4 tracking comes with a different tracking ID. We currently offer built-in support for the Universal tracking IDs and Google Analytics 4 tracking IDs will need to be added manually. For more information on connecting to Google Analytics 4  please see our wiki article here.


SEO Checklist


In order to maximize your search engine optimization it is best to fill in as much meta information for your website as possible, including each page. Visit the SEO Checklist to see what needs to be updated. Each time you update a page's SEO information, it will update on the SEO checklist. Look for green check marks on items you have completed and empty check boxes on items you still need to complete.


Go Back

Google Analytics 4 is the newest generation of Google Analytics. Google Analytics 4 properties combine app and web measurement.  If you created your Google Analytics account after December 2021, you will likely have a Google Analytics 4 measurement ID (format: G-XXXXXXX).


Once you have added your website as property on Google Analytics, please follow the below steps to obtain your Google Analytics code:


Obtaining your Measurement ID


1. Open Google Analytics and visit the Admin panel via the button in the bottom left corner of the left menu pane:


2. Select the Setup Assistant.


3. Select Data Streams.


4. Click the Global Site Tag dropdown to view your tracking ID code.


5. Click the Copy symbol in the top right corner to save your code to your keyboard.


Adding your Google Analytics 4 Measurement ID to your SiteBlocks Website


To add your Measurement ID code, you will need to paste it into the header of your website. Simply go to SITE > Site Settings > Head Tag and paste your Measurement ID code from Step 5 into the text field. Remember to save your changes.


Go Back

Managing your Page SEO

Page SEO

 
Custom Keywords are used by some search engines for indexing your website. Keywords should be in a comma-separated list (eg: hockey, sport, NHL).
 
The Description will be used in the meta tags when people or search engines visit your website. Most search engines will use the description for a summary in their search results.
 
Note:
The meta tag information added here will be specific to the page you're modifying the settings for, and not for your entire site! To create meta tags for your entire site, please add them to the Keywords area in the Head Tag section of your Site-wide Settings.


Where to Find


Clicking the "SITE" button in the main toolbar, as in the below image, will bring up the "SEO" option in the menu.

Note: Page-specific SEO settings can also be managed in the "PAGES" section of the Toolbar. Here you can select the cogwheel icon on the page you wish to manage to bring up the "SEO" sub-menu.


Go Back

Adding A Site Manager

 
Want to allow another person to edit your SiteBlocks website without having to grant full access to your full account? You can achieve this by adding them as a Site Manager directly through your SiteBlocks editor. You can use our Site Manager's feature to grant multiple people access to edit your website.


Add a Site Manager

 
Step 1: Activate the Site Managers feature on your website

Firstly Edit your Site Builder website. In the Main Toolbar select SITE and then Site Managers from the sub-menu. If this is the first time you have visited this location you will need to press "Activate Site Managers" to begin.


Step 2: Add a Site Manager

Under the Site Manager menu click "Create A New User".


Fill in the Full Name, Email, and Password of your Site Manager (this will be the site manager's login credentials) and click "Done" when complete.


Step 3: Invite your new Site Manager(s) to edit your website

Under the Manage Site Managers menu, there will be an invite link you can copy. Your new Site Manager can use this link to log in to your SiteBlocks website from here.


Go Back

Spotify Follow Element

Share your favorite artist's Spotify page by adding this element! Once you link your account to this element, your visitors can follow them by clicking the element on your page.


Adding Spotify to Your Website


After selecting this Element, you will be able to choose exactly where you want to add it! Simply drag this onto a blue, orange, or purple ribbon that will appear when dragging the element onto the page.


Connecting your Spotify Account


You will need to obtain the URL for your Artist page. You can do this by navigating to the artist's Spotify page and copying the link.


Your artist page URL will likely follow this format: https://open.spotify.com/artist/MyUserName


NOTE: This element is intended for Spotify Artist pages only. If you are a regular Spotify member and do not post your own music on Spotify, you likely will not have the appropriate type of account to share on this Element.


For more options for your Element, you can visit the following in the Element Toolbar:

Settings: Connect an artist's page by pasting the URL in the "Link to Artist" field. Change the layout or toggle between the light and dark themes by adjusting the corresponding dropdown menus.


Animate: You can add an animation for your Element. This will appear when the visitor first loads your page and the animation will display as your Element appears on the page.


Duplicate: To quickly add another Element, select the "Duplicate" option in the Element's toolbar.


Pin: You can optionally "Pin" the element to multiple pages to add consistency to the style of your website.


Go Back

Website Statistics

Statistics Overview


This area will allow you to take a look at the visitor statistics for your website in detail via our collected server-side data. Please note that this will not track any activity while you are logged into your account - these are strictly external page statistics.

The information you see when first visiting this area is the Overview section displaying Page Views and Site Visits. Page Views display the number of times individual pages have been viewed. Site Visits report how many times people have viewed your website.

To view your statistics, go to 'SITE' > 'Statistics' in your SiteBlocks editor.


Page Views


In addition to the information shown on the Overview page, you can also take a more detailed look at your Page Views by clicking on the Page Views tab. This will allow you to take a closer look at your Page views for a shorter time period with a Daily Breakdown to show you Page Views and Site Visits by the day.

To view your statistics, go to 'SITE' > 'Statistics' > 'Page Views' in your SiteBlocks editor.


Top Pages


See which pages are the most popular with your visitors by viewing your top pages/

Within your top pages, you will find an 'Entry Visits' column referring to the entry page for a visit to your website. For example, if a visitor comes to your /about page via a Google search, then to your / (home) page that's 1 visit, 2 Page Views (one for each page) and the Entry Visit would be tracked on /about. This statistic is intended to help you see where people are coming to initially when visiting your site.

To view your statistics, go to 'SITE' > 'Statistics' > 'Top Pages' in your SiteBlocks editor.


Top Referrers


You can view referring information to find out where your visitors are coming from. This will help provide insight into how people are finding your website. For example, if another website is linking to your website which is bringing many visitors to your website, you should be able to see this here.

To view your statistics, go to 'SITE' > 'Statistics' > 'Top Referrers'  in your SiteBlocks editor.


Go Back


The Facebook Comments Element (also listed as FB Comments) will allow your visitors to leave comments on your page through their Facebook accounts. This is a great way to increase interactivity on your website.


If a visitor tries to comment logged out of their Facebook account, the post button will display the text "Log in to Post", prompting them with a Facebook login portal pop-up.


Where to Find


This Element can be found in the "ELEMENTS" section of the Toolbar.


Adding to Website


After selecting this Element, you will be able to choose exactly where you want to add it! Simply drag this onto a blue, orange, or purple ribbon that will appear when dragging the element onto the page.


Options


For more options for your Element, you can visit the following in the Element Toolbar:


Settings: Adjust the number of comments displayed with the slider tool. You can also toggle between a light and dark theme for your comments by selecting the theme from the Color Scheme drop-down menu. Remember to press Save Changes to confirm any changes made.


Animate: You can add an animation for your Element. This will appear when the visitor first loads your page and the animation will display as your Element appears on the page.


Duplicate: To quickly add another Element, select the "Duplicate" option in the Element's toolbar.


Pin: You can optionally "Pin" the element to multiple pages to add consistency to the style of your website.
 

Go Back

Payments

Which payment types do you accept?


We currently accept Visa and Mastercard credit cards and PayPal. If you wish to use an alternate payment method, please contact us. Please ensure your card is authorized for international payments as we are located in Canada.


How can I change my billing information?


To do this, simply click on the Billing link in your Account Overview area located at the bottom of your page:


Then click on Update Billing Information:

Go Back

We don't automatically submit websites to search engines at this time and note that over time, they will locate your website and index it accordingly. If you'd prefer not to wait, you can submit your website manually by visiting the appropriate location on their website.

You can submit your site to Google here:

https://search.google.com/search-console/about


We also encourage you to ensure your Sitemap in the Website Settings section of the editor is enabled (it is by default).

For more information about managing your sitemap and how to access it, your can read our wiki article about Your Sitemap.

Go Back

Your Sitemap

You can submit your sitemap directly to Google via the Google Search Console. This makes it easier for Google to crawl and index your site.


Obtaining your sitemap:


You can access your sitemap by typing in the URL as follows:

For example, if your website is: https://example.com 


Your sitemap URL would be: https://example.com/sitemap.xml 


Note: We recommend submitting your sitemap after making any changes to your website. Such as creating new pages, or adding new images that impact your website.
In order to successfully submit your sitemap to Google, you must first verify your domain with Google Search Console. Once verified, Google will identify you as the site owner.


Editing your sitemap:


1. Click "SITE" in the main left toolbar
2. Click "SEO" in the submenu
3. Click the Sitemap Tab to access your sitemap settings.


Go Back


The Support Center is one of the many places members can get help with anything website related. The SiteBlocks support team can be contacted directly in this area and responses to support tickets opened are responded to quickly.

This Wiki should be a huge source of help for all of our users - don't see something that should be included here? Let us know so we can improve it for you and others!


Where to Find


The Support Center link is located at the bottom of your Account Overview Dashboard under "Community". From here, you can create a support ticket or talk to our live chat agents if they are online.

Quick access to this Wiki or the website builder Forum is available via the help link on the Toolbar.

Go Back

Custom Error Page


A convenient feature we have included is the ability to create a custom error page for your site. This means that if someone visits a page no longer associated with your site, though an outdated link for example, or if they mistype a page name associated with your website address, they will see the error page that you have customized. This type of error is known as a 404 error. Editing this 404 error page is a good idea to maintain the consistency of your website's appearance in the event of an error.

Note: This page can't be deleted. Page settings are manageable, however, and you can change the page name, description, and layout style if other layouts exist for your template.


Where to Find


In order to access this page, you will need to make sure you are logged into your account and are currently using the site editor. Simply navigate to your Page List by clicking the “PAGES” button in the main toolbar on the left. You can also access this page by typing in the /404 URL.

For example, if your website is:   https://yourdomain.com

The error page can be accessed at this address:   https://yourdomain.com/404


Editing your Error Page


Assuming you're logged into your account and using the editor, your 404 error page will load within the editor, allowing you to make changes to it. This is edited in the same way as any other page. We have included some default content for your error page with some text in Paragraph Element.
 

Go Back

Blog Search Element


Adding a blog search tool to your blog is a great way to allow your visitors to search through your posts and draw in results related to what they are looking for. You can type in keywords, phrases, or sentences and the blog search tool will return a page with blog posts that contain this content in the title or body of the post. 


The Blog Search Element will only return posts that are public from public categories and not password-protected categories (to learn more about password-protecting your blog posts, see Managing Blog Categories).


Where to Find


To add a Blog Search tool to your website, you can drag a "Blog Search" element in from the elements list located on the left side menu.


Options


Element Wrapper: Add some style to your element! Customize the font, background, create a border, and adjust the space around the element by changing the margin and padding values.


Animate: You can add an animation for your Element. This will appear when the visitor first loads your page and the animation will display as your Element appears on the page.


Duplicate: To quickly add another Element, select the "Duplicate" option in the Element's toolbar.


Pin: You can optionally "Pin" the element to multiple pages to add consistency to the style of your website. Simply select the "Pin" option in your Element's toolbar.                     

Go Back

20 blog posts