
Where to Find
This element can be found in the "Add Content to Page" section of the Toolbar.
Adding to Website
Add a slideshow element to your website to display a collection of images.
After selecting this element, you will be able to choose exactly where you want to add it! You will see all available content locations it can be added to - on the current page only (content locations are indicated by the orange, blue or purple ribbons).
Selecting Images for Your Slideshow
The Slideshow Element works by displaying a folder of images on your page. You can access your image settings from the "Images" option in the Element Toolbar. You can configure your slideshow by choosing the folder to display images from via the drop-down.
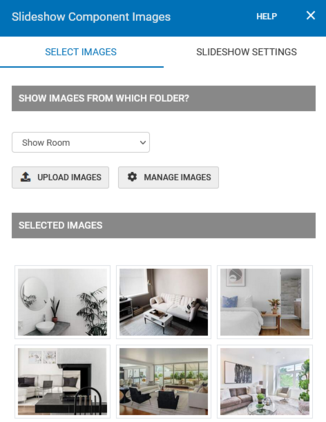
If you would like to add more images to your folder, you can click the "Upload Images" button to directly upload images or "Manage Images" to access the Photos and Media manager for access to your entire file library for your Site Blocks site.
Note: For help creating folders and organizing images, please see File Folders.
Options
You can adjust the slideshow settings including the transition style, image order and speed from "Settings" in the Element Toolbar.
- Slideshow Height: Adjust the height of your images in your slideshow
- Max Width: Adjust the height of your images in your slideshow
- Transition Effects: Allows you to choose what style of transition effect is used between images. We recommend you try a few to decide which style you like!
- Transition Timing: Choose how long you want each image to appear before transitioning to the next image
- Animation Speed: Set the speed of the animation for the transition effect
- Images Shown: Set how many images you would like to display in your slideshow. For example, setting this value to 2 will display the first 2 images in your folder
- Randomize Images: Keep your images in the order they are in the folder or randomize the order of the images
- Show Titles: Display the name of your images at the bottom of your slideshow
- Nav Dots Position: Set the navigation dots below the slideshow or on the top or bottom of the images
- Show Navigation Arrows< >: Choose if you would like to display the arrows on the images for navigation
- Show Navigation Dots····: Choose if you would like to display the arrows on the images for navigation
You can access further styling options including styling options for the arrows, navigation dots, adding a border, padding and margins for the Slideshow Element can be found in the "Element Wrapper" toolbar option.
- Controls: Adjust the color of the navigation arrows
- Indicators: Adjust the height, width, and color settings for the navigation dots
- Active Indicators: Adjust the colors of the navigation dot of the image that is currently displayed
- Borders: Add a border around your slide show by selecting the style, width, rounding and coloring. Tip: Increase the Padding to add more space between the slideshow and the border
- Padding: Increase the padding around the Slideshow Element
- Margin: Increase the margin around the Slideshow Element
You can add an animation for your Slideshow Element. This will appear when the visitor first loads your page and the animation will display before your Slideshow Appears. To add an animation, simply visit the "Animation" option of the Element toolbar.
You can optionally "Pin" the element to multiple pages to add consistency to the style of your website. Simply select the "Pin" option in your Element's toolbar.
To quickly add another Slideshow Element on your page, select the "Duplicate" option in the Element's toolbar.