Menu

Welcome to the SiteBlocks Site Builder

HELP CENTER

Blog posts : "Elements"

Counter Element

Use this element to display your total site visits or page views.


How to Add the Counter

After selecting this element, you will be able to choose exactly where you want to add it! Simply drag this onto a blue, orange, or purple ribbon that will appear when dragging the element onto the page.


Options


Settings: From the drop-down menu, select "Unique Visits" to display total website views or "Page Views" to see how many people have viewed the page your Element is on. You can also reset this counter (both page views and unique visits) entirely by clicking the blue "Reset Counter" button. Please note that clicking Reset Counter is irreversible and will permanently reset this counter on your website.


Element Wrapper: Add some style to your element! Customize the font, and background, create a border, and adjust the space around the element by changing the margin and padding values.


Animate: You can add an animation for your Element. This will appear when the visitor first loads your page and the animation will display as your Element appears on the page.


Duplicate: To quickly add a copy of an Element, select the "Duplicate" option in the Element's toolbar.


Pin: You can optionally "Pin" the element to multiple pages to add consistency to the style of your website. Simply select the "Pin" option in your Element's toolbar. 


Go Back

Tweets Element

Note: This Element is currently unavailable. We are experiencing technical issues with our Twitter API, and our ability to connect Twitter accounts is no longer available. We will reconnect Twitter services if they ever become available to us again. We sincerely apologize for any inconvenience.

Share your tweets on your website by adding this element. Visitors will be able to scroll through your Twitter page with your most recent tweets at the top.


Where to Find


This Element can be found in the "ELEMENTS" section of the Element Toolbar.


Adding to Website


After selecting this Element, you will be able to choose exactly where you want to add it! Simply drag this onto a blue, orange, or purple ribbon that will appear when dragging the Element onto the page.


Options


For more options for your Element, you can visit the following in the Element Toolbar:


Settings

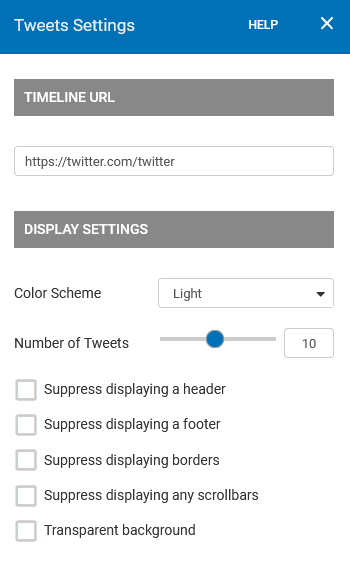
  • Twitter URL - Paste your twitter account URL into the Twitter URL field ( For example: https://twitter.com/twitterusername). Please note this will only work if you link a valid profile name. You can find this URL by navigating to your Twitter profile page and inspecting the address bar in your browser.
  • Display Settings - Choose a small or large follow button by using the Button Size drop down menu. You may also select from the following display options:
    • Suppress displaying a header
    • Suppress displaying a footer
    • Suppress displaying borders
    • Suppress displaying any scrollbars
    • Transparent background


Animate: You can add an animation for your Element. This will appear when the visitor first loads your page and the animation will display as your Element appears on the page.


Duplicate: To quickly add another Element, select the "Duplicate" option in the Element's toolbar.


Pin: You can optionally "Pin" the element to multiple pages to add consistency to the style of your website.


Go Back

RSS Feed

Display your favorite RSS feeds on your page by adding this element.


Adding to Website


After selecting this Element, you will be able to choose exactly where you want to add it! Simply drag this onto a blue, orange, or purple ribbon that will appear when dragging the Element onto the page.


Options


For more options for your Element, you can visit the following in the Element Toolbar:


Feeds: You can configure it by entering as many feed locations as you want and clicking on the "Add Feed" button. All current feeds will display below in the Current Feeds section. Click the trash icon to remove a Feed from the Current Feeds section.

Settings: Decide how the feed will show: Titles only, a Summary with images, or a Summary with no images. The Number to Display field will let you set the number of feeds that display on your page at a time - between 1 to 15 or all available.


Animate: You can add an animation for your Element. This will appear when the visitor first loads your page and the animation will display as your Element appears on the page.


Duplicate: To quickly add another Element, select the "Duplicate" option in the Element's toolbar.


Pin: You can optionally "Pin" the element to multiple pages to add consistency to the style of your website.


Go Back

Ebay Listings Element

Share your eBay store listings on your website by adding the eBay Listings element!


Connect your eBay Account


Once you have added this element to your page, you will need to connect your account to display your listings. To get started, navigate to "Settings" found in the Element's Toolbar. Enter your eBay username into the Username field and select your country from the drop-down menu (the country of your listing's currency will need to be selected in order for the items to be displayed).


Adding to Website


After selecting this Element, you will be able to choose exactly where you want to add it! Simply drag this onto a blue, orange, or purple ribbon that will appear when dragging the element onto the page.


Options


For more options for your Element, you can visit the settings below in the Element Toolbar.

 
Settings
  • Ebay Username: Enter your eBay account username in order to display your listings.
  • Country: Select the country of your listing's currency.
  • Display Settings
    • The element can be set to Show any of the following listing details: Auction Items Only, Fixed Price Items Only, Store Items Only, Auction and Fixed Price Items, All Items.
    • The Items Per Page field will let you set the number of feeds that are displayed on your page at a time - between 1 to 15.
    • You can Order By Price, time left or Listing Date


Animate: You can add an animation for your Element. This will appear when the visitor first loads your page and the animation will display as your Element appears on the page.


Duplicate: To quickly add another Element, select the "Duplicate" option in the Element's toolbar.


Pin: You can optionally "Pin" the element to multiple pages to add consistency to the style of your website.

'


Go Back

Ecwid Bag Element

Create a digital shopping bag for your website. This element will allow customers visiting your website to drag and drop-in items for checkout.


Adding to your Website


After selecting this Element, you will be able to choose exactly where you want to add it! Simply drag this onto a blue, orange, or purple ribbon that will appear when dragging the Element onto the page.


Options


For more options for your Element, you can visit the following in the Element Toolbar:


Settings: To customize your Ecwid account settings you will need to login to your account on ecwid.com. From there you will be able to add new products to your online store. The element on your website will update automatically!  For more information on adding additional accounts please see the Connect your Account section is the Ecwid Element wiki.


Animate: You can add an animation for your Element. This will appear when the visitor first loads your page and the animation will display as your Element appears on the page.


Duplicate: To quickly add another Element, select the "Duplicate" option in the Element's toolbar.


Pin: You can optionally "Pin" the element to multiple pages to add consistency to the style of your website.


Go Back

Ecwid Search

Create a search box for the products you sell. This element will allow customers visiting your website to easily browse through items in your Ecwid.com online store.

You will need to connect your Ecwid Account. For more information on connecting your Ecwid account, please see the Connect your Account section in the Ecwid Element wiki article.


Adding to Website


After selecting this Element, you will be able to choose exactly where you want to add it! Simply drag this onto a blue, orange, or purple ribbon that will appear when dragging the Element onto the page.


Options


For more options for your Element, you can visit the following in the Element Toolbar:


Settings: To customize your Ecwid account settings you will need to login to your account on ecwid.com. From there you will be able to add new products to your online store. The element on your website will update automatically! You can select your Ecwid account from the drop-down menu, if you would like to add more, click "Manage". For more information on adding additional accounts please see the Connect your Account section in the Ecwid Element wiki.


Animate: You can add an animation for your Element. This will appear when the visitor first loads your page and the animation will display as your Element appears on the page.


Duplicate: To quickly add another Element, select the "Duplicate" option in the Element's toolbar.


Pin: You can optionally "Pin" the element to multiple pages to add consistency to the style of your website.


Go Back

Ecwid Products Element


Display products from your Ecwid.com online store. This element will allow customers visiting your website to select and purchase items.


Connect your Account


You will need to connect your Ecwid Account. When first adding this element from the Element List, it will display the following message with a hotlink: "You must set up an Ecwid Account". Click on the blue hotlink to open the Ecwid E-Commerce Shopping Setup window to get started.

If you do not have an account, you will need to create one. Once the sign-up process is complete and you have confirmed your email, you can log in using your new Store ID.

If you already have an Ecwid account you can log in by clicking the "Log in to Existing Account".


You can connect additional accounts by Navigating to "Settings" in the Element's Toolbar. You will be brought to the Ecwid Product List page where you can click "Manage" next to your existing Ecwid Account. Click the "" icon to add an additional account.


Adding to Website


After selecting this Element, you will be able to choose exactly where you want to add it! Simply drag this onto a blue, orange, or purple ribbon that will appear when dragging the element onto the page.


Options


For more options for your Element, you can visit the following in the Element Toolbar:


Settings: To customize your Ecwid account settings you will need to log in to your account on ecwid.com. From there you will be able to add new products to your online store. The element on your website will update automatically! You can select your Ecwid account from the drop-down menu, if you would like to add more, click "Manage". For more information on adding additional accounts please see the Connect your Account paragraph above.


Animate: You can add an animation for your Element. This will appear when the visitor first loads your page and the animation will display as your Element appears on the page.


Duplicate: To quickly add another Element, select the "Duplicate" option in the Element's toolbar.


Pin: You can optionally "Pin" the element to multiple pages to add consistency to the style of your website.


Go Back

PayPal Element

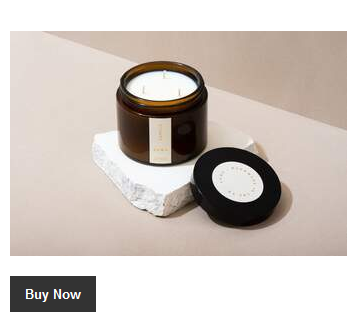
Use this Element to allow your visitors to purchase products on your site with PayPal by displaying a PayPal "buy now" button, add to and view items in their shopping cart, or make a donation.


Tip: Add an Image Element of the merchandise near your PayPal button to showcase your products and catch your viewer's attention.

Connect your PayPal Account

You will need to connect your PayPal Account. If you haven't already created an account, you can do so from the official PayPal signup page: https://www.paypal.com/ca/for-you/account/create-account.

Once you have your PayPal Account, you can enter your PayPal account email into the "Account Email" field found in the "Settings" option in the Element's Toolbar. Remember to click "Save Changes" to update your element.


Adding to Website


After selecting this Element, you will be able to choose exactly where you want to add it! Simply drag this onto a blue, orange, or purple ribbon that will appear when dragging the Element onto the page.


Options


For more options for your Element, you can visit the following options in the Element Toolbar.

Settings:
  • PayPal Settings
    • Button: By default, your button will display "Buy it Now". Select from the drop-down menu to change the button text.
    • Button Text: Set custom PayPal button text in this field.
    • Account Email: Enter your PayPal account email to connect your PayPal account.
  • Product Settings
    • Item Name: This is a required field. Describe what you are selling with an Item Name.
    • Currency: Select what currency your price will be listed in.
    • Price: Set the cost of your item in the currency selected in the drop-down above. This will be the price billed to the customer.
    • Weight: You can optionally set a weight for your item.
    • Order Complete URL: Select the location you would like your visitors to return to after purchase.
Switch Button Styles: Change the PayPal button from the default styling. You can select from different button styles in the Button Editor. If you would like to customize the button further, click the pencil icon in the top right corner.


Animate: You can add an animation for your Element. This will appear when the visitor first loads your page and the animation will display as your Element appears on the page.


Duplicate: To quickly add another Element, select the "Duplicate" option in the Element's toolbar.


Pin: You can optionally "Pin" the element to multiple pages to add consistency to the style of your website.


Go Back

GitHub Element

Share your GitHub repositories with your visitors by adding this Element to your page.


Connect your GitHub Account


You will need to connect your GitHub Account. If you haven't already created an account, you can do so from the official GitHub sign-up page: https://github.com/join.

Once you have your GitHub Account, you can enter your username into the GitHub username field found in the "Settings" option in the Element's Toolbar. Remember to click "Save Changes" to update your element.


Adding to Website


After selecting this Element, you will be able to choose exactly where you want to add it! Simply drag this onto a blue, orange, or purple ribbon that will appear when dragging the Element onto the page.


Options


For more options for your Element, you can visit the following in the Element Toolbar:


Settings
  • GitHub Username: Enter in your GitHub username to display your repositories. You can optionally display your avatar by enabling the "Show Avatar" checkbox
  • Repositories: You can choose to display all of your GitHub repositories or you can display the X most recent repositories (this is by default 30)
  • Click Behavior: Choose what happens when a visitor clicks on the name of a repository. Select "Expand" to display more information about the repository (including the description, created and pushed at). Select "Link" to direct your visitors to your GitHub repository page. Lastly, you can select "None" for no action to take place when the user clicks the repository name.


Animate: You can add an animation for your Element. This will appear when the visitor first loads your page and the animation will display as your Element appears on the page.


Duplicate: To quickly add another Element, select the "Duplicate" option in the Element's toolbar.


Pin: You can optionally "Pin" the element to multiple pages to add consistency to the style of your website.


Go Back

Disqus Element

Add the Disqus Element to your page to provide a third-party community platform used by many others across the web. With Disqus, your website will gain a comment section that will support discussion and interactions among your visitors.


Connect your Disqus Account


You will need to connect your Disqus Account. If you haven't already created an account and a Shortname, you can do so from the official Disqus sign-up page: https://disqus.com/profile/signup/.

Once you have your Shortname for your Discus Account, you can enter this into the Shortname field via the "Settings" option in the Element's Toolbar. Remember to click "Save Changes" to update your element.


Adding to Website


After selecting this Element, you will be able to choose exactly where you want to add it! Simply drag this onto a blue, orange, or purple ribbon that will appear when dragging the Element onto the page.


Options


For more options for your Element, you can visit the following in the Element Toolbar:


Settings: This is where you can connect your Discus Account. For more information, please see the "Connect your Discus Account" paragraph above.


Animate: You can add an animation for your Element. This will appear when the visitor first loads your page and the animation will display as your Element appears on the page.


Duplicate: To quickly add another Element, select the "Duplicate" option in the Element's toolbar.


Pin: You can optionally "Pin" the element to multiple pages to add consistency to the style of your website.


Go Back

Tweets Button Element

Increase your twitter engagement by adding this element to your page! Once you link your profile, your visitors can add tweets by clicking the follow button on your page.


Where to Find


This Element can be found in the "ELEMENTS" section of the Element Toolbar.


Adding to Website


After selecting this Element, you will be able to choose exactly where you want to add it! Simply drag this onto a blue, orange, or purple ribbon that will appear when dragging the Element onto the page.


Options


For more options for your Element, you can visit the following in the Element Toolbar:


Settings: Add your Twitter post information so your followers can include you as a contributor when they create a tweet with this button. You can also choose the button display size.


Animate: You can add an animation for your Element. This will appear when the visitor first loads your page and the animation will display as your Element appears on the page.


Duplicate: To quickly add another Element, select the "Duplicate" option in the Element's toolbar.


Pin: You can optionally "Pin" the element to multiple pages to add consistency to the style of your website.


Go Back

YouTube Subs Element

Collect followers for your YouTube channel by adding this element to your page! Once you link your channel to this element, your visitors can subscribe to you by clicking the button on your page.


Adding to Website


After selecting this Element, you will be able to choose exactly where you want to add it! Simply drag this onto a blue, orange, or purple ribbon that will appear when dragging the element onto the page.


Connecting your YouTube Channel


You will need to obtain the URL for your channel. You can do this by navigating to your channel's front page and copying the link.

Depending on the type of URL your channel has, you will need to provide the portion after the "/":
  • ID-based URL: youtube.com/channel/UCUZHFZ9jIKrLroW8LcyJEQQ
  • Custom URL: youtube.com/c/YouTubeCreators
  • Legacy username URL: youtube.com/user/partnersupport
 

Options


For more options for your Element, you can visit the following options in the Element Toolbar.


Settings:
  • YouTube Channel URL: Paste your YouTube channel URL to connect it here. For more information see the 'Connecting Your YouTube Channel' section above.
  • Display Settings:  Choose to display your YouTube avatar next to the Subscribe button if you would like a light or dark theme for the Channel name text by using the drop-down menus in this section.


Animate: You can add an animation for your Element. This will appear when the visitor first loads your page and the animation will display as your Element appears on the page.


Duplicate: To quickly add another Element, select the "Duplicate" option in the Element's toolbar.


Pin: You can optionally "Pin" the element to multiple pages to add consistency to the style of your website.


Go Back

Collect followers for your Pinterest profile by adding this element to your page! Once you link your profile, your visitors can follow you by clicking the button on your page.


Where to Find


This Element can be found in the "ELEMENTS" section of the Element Toolbar.


Adding to Website


After selecting this Element, you will be able to choose exactly where you want to add it! Simply drag this onto a blue, orange, or purple ribbon that will appear when dragging the Element onto the page.


Options


For more options for your Element, you can visit the following options in the Element Toolbar.


Settings: Paste your Pinterest profile name into the field to complete the URL (for example https://pinterest.com/MyUserName123). Please note this will only work if you link a valid profile name. You can find this information by navigating to your Pinterest profile page and inspecting the address bar in your browser.


Animate: You can add an animation for your Element. This will appear when the visitor first loads your page and the animation will display as your Element appears on the page.


Duplicate: To quickly add another Element, select the "Duplicate" option in the Element's toolbar.


Pin: You can optionally "Pin" the element to multiple pages to add consistency to the style of your website.


Go Back

Pinterest Pin Element

Share your favorite Pinterest pins with your visitors by adding this element to your page.


Adding a Pinterest Pin


Once you have added this element to your page, all that is required is the URL of the pin you would like to share and you are ready to go! Simply paste this URL into the Pinterest pin field found in "Settings" which can be found in your Element's Toolbar.


Where to Find


This Element can be found in the "ELEMENTS" section of the Element Toolbar.


Adding to Website


After selecting this Element, you will be able to choose exactly where you want to add it! Simply drag this onto a blue, orange, or purple ribbon that will appear when dragging the Element onto the page.


Options


For more options for your Element, you can visit the following options in the Element Toolbar.


Settings: Paste your Pinterest pin URL in the field located here. Please note this will only work with the Pinterest Pin and not a collection or profile. Remember to click "Save Changes".


Animate: You can add an animation for your Element. This will appear when the visitor first loads your page and the animation will display as your Element appears on the page.


Duplicate: To quickly add another Element, select the "Duplicate" option in the Element's toolbar.


Pin: You can optionally "Pin" the element to multiple pages to add consistency to the style of your website.


Go Back

Facebook Like Element

The Facebook Like Element (also listed as "FB Like") will allow your visitors to like your page through their Facebook accounts. This is a great way to increase interactivity on your website.


If a visitor tries to like your page while logged out of their Facebook account, the like button will prompt them with a Facebook login portal pop-up to log into their account.

You can also enable a Share button to display next to your Facebook-like button from the "Settings" option found in your Element's Toolbar.


Where to Find


This Element can be found in the "ELEMENTS" section of the Toolbar.


Adding to Website


After selecting this Element, you will be able to choose exactly where you want to add it! Simply drag this onto a blue, orange, or purple ribbon that will appear when dragging the element onto the page.


Options


For more options for your Element, you can visit the following in the Element Toolbar:


Settings
  • Like URL: Paste the URL of the page that you would like your visitors to like (this could be your shop or homepage for example).
  • Display Settings: Adjust your layout style to display a simple 'Like' icon or add a 'Like Count'. Change the 'Verb to Display' to alter the display text. Adjust the color scheme to a light or dark color scheme via the Color Scheme drop-down. Lastly, you can adjust the button size from small to large with the Button Size drop-down menu.


Animate: You can add an animation for your Element. This will appear when the visitor first loads your page and the animation will display as your Element appears on the page.


Duplicate: To quickly add another Element, select the "Duplicate" option in the Element's toolbar.


Pin: You can optionally "Pin" the element to multiple pages to add consistency to the style of your website.


Go Back

Facebook Pages Element

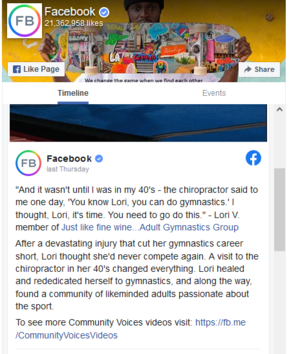
Share your Facebook page on your website by adding this element. Visitors will be able to scroll through your Facebook page timeline and Events that are made public.


Note: This Element is designed to display a Facebook page and not a Facebook profile. Attempting to link your Facebook profile will not work through this element.


Link your Facebook Page


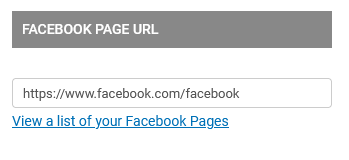
Once you have copied the complete URL to your Facebook page and you have added this Element to your website, you are ready to connect your Facebook page. You can paste the Facebook page URL into the Facebook Page URL input field found in the "Settings" of your Element Toolbar.


Where to Find


This Element can be found in the "ELEMENTS" section of the Toolbar.


Adding to Website


After selecting this Element, you will be able to choose exactly where you want to add it! Simply drag this onto a blue, orange, or purple ribbon that will appear when dragging the Element onto the page.


Options


For more options for your Element, you can visit the following in the Element Toolbar:


Settings
  • Facebook Page URL: Paste in a valid URL to your Facebook page. For more information please see the 'Link your Facebook Page' paragraph above
  • Tabs: Select from the checkboxes to enable or disable the following options: 'Show timeline tab' , 'Show events tab Show messages tab'
  • Display Options: Select from the checkboxes to enable or disable the following options: 'Use a smaller version of your page header', 'Hide the cover photo in your header', and 'Show profile photos when friends like this page'. The Element size Width and Height sliders will allow you to specify the size of the contents within this Element (within the boundaries of the element container).


Element Wrapper: Add some style to your element! Customize the font, background, create a border, and adjust the space around the element by changing the margin and padding values.


Animate: You can add an animation for your Element. This will appear when the visitor first loads your page and the animation will display as your Element appears on the page.


Duplicate: To quickly add another Element, select the "Duplicate" option in the Element's toolbar.


Pin: You can optionally "Pin" the element to multiple pages to add consistency to the style of your website.


Go Back

Social Links Element

This element allows you to advertise your social media links through a list of clickable social media icons that will direct your visitors to your social media profiles.


Add your social links for the following social media websites: Twitter, Facebook, Vimeo, YouTube, Instagram, Snapchat, LinkedIn, Pinterest, Flickr, Tumblr, RSS, Tripadvisor, and Spotify.


Where to Find


This element can be found in the "ELEMENTS" section of the Toolbar.


Adding to Website


After selecting this Element, you will be able to choose exactly where you want to add it! Simply drag this onto a blue, orange, or purple ribbon that will appear when dragging the Element onto the page.


Edit your Links


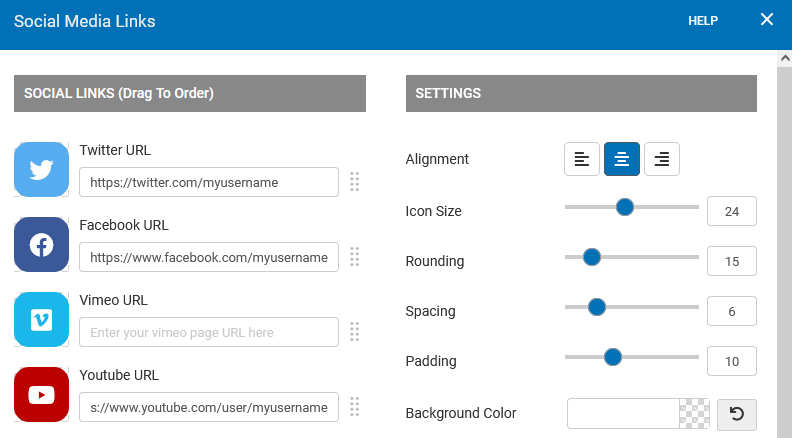
You can manage your social links via the "Settings" option in the Element Toolbar. Paste your social media profile URL next to the corresponding social media icon to add a clickable icon to the Element. If you would like to remove a social link, simply clear the URL field and this will remove the clickable icon from the Element. You can also change the order of your social links by dragging the social link in the menu.


Options


For more options for your Element, you can visit the following in the Element Toolbar:


Settings: Customize your social links from the left-hand side column (for more information see the Edit your Links paragraph above). You can also edit the appearance of the social icons displayed in your Element from the Settings column on the right. You can adjust the size, spacing, location, and color scheme from the column on the right. Remember to click the Save Changes button to confirm any changes.


Element Wrapper: Add some style to your element! Customize the font, background, create a border, and adjust the space around the element by changing the margin and padding values.


Animate: You can add an animation for your Element. This will appear when the visitor first loads your page and the animation will display as your Element appears on the page.


Duplicate: To quickly add another Element, select the "Duplicate" option in the Element's toolbar.


Pin: You can optionally "Pin" the element to multiple pages to add consistency to the style of your website.


Go Back

Share Buttons Element

The Share Buttons Element displays icons from a variety of popular social networking sites that allow you to connect your site and it's pages to these networks.


Where to Find


This element can be found in the "ELEMENTS" section of the Toolbar.


Adding to Website


After selecting this Element, you will be able to choose exactly where you want to add it! Simply drag this onto a blue, orange, or purple ribbon that will appear when dragging the Element onto the page.


Options


For more options for your Element, you can visit the following in the Element Toolbar:


Settings: Customize your Share Buttons Element by choosing what Share Buttons you would like to display. Click on an icon from the Popular Icons list to add it to your page.


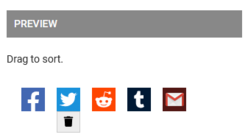
To remove an icon from your page, hover your mouse over the icon in the Preview section and then click the Trash Icon that appears.


Element Wrapper: Add some style to your element! Customize the font, background, create a border, and adjust the space around the element by changing the margin and padding values.


Animate: You can add an animation for your Element. This will appear when the visitor first loads your page and the animation will display as your Element appears on the page.


Duplicate: To quickly add another Element, select the "Duplicate" option in the Element's toolbar.


Pin: You can optionally "Pin" the element to multiple pages to add consistency to the style of your website. 


Go Back

Audio Player Element

This element will allow you to display a playlist of MP3 files you have uploaded to be played either automatically or manually on one or several of your website pages.


Important Note: This Audio Player element is written in Flash and may not be compatible with most hand-held devices as Flash support has been removed for most Android and Apple devices.


Uploading Music & Building a Playlist


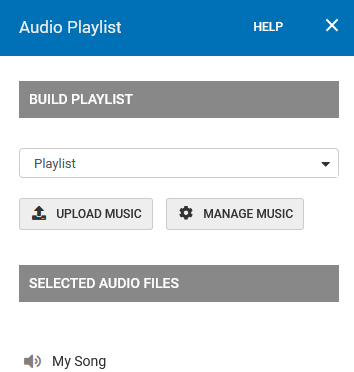
All music and audio files are organized into playlists. You can access the Playlist Settings from the "Settings" option located in the Element Toolbar. To select the audio that you would like to play in the Audio Player Element, select the playlist folder from the dropdown.


You can upload music to this playlist by clicking the Upload Music button.

To create a new playlist or manage the audio files in that playlist, click the Manage Music button to open your Photos and Media Manager, where you can create a new playlist folder, rearrange the music files, and rename, add, or delete files.

Remember to click Save to confirm your changes in the Playlist Settings menu.


Customize your Audio Player 


Customize your audio player via the "Settings" option in the Element Toolbar.


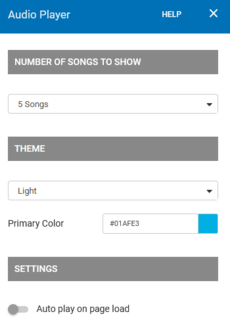
Select the Number of Songs to Show from the corresponding dropdown menu.

You can also customize the appearance of your Audio Player Element from the theme section. You can select a Light or Dark theme from the dropdown menu to change the main theme color of the Element. Also, customize the accent color of your Element's buttons by adjusting the Primary Color.

If you would like your audio files to play automatically without requiring your visitors to press the Play Button, you can enable this by turning on the "Autoplay on page load" switch.

Remember to click Save to confirm your changes in the Settings menu.


Where to Find


This element can be found in the "ELEMENTS" section of the Toolbar.


Adding to Website


After selecting this Element, you will be able to choose exactly where you want to add it! Simply drag this onto a blue, orange, or purple ribbon that will appear when dragging the element onto the page.


More Options


For more options for your Element, you can visit the following options in the Element Toolbar.


Element Wrapper: Add some style to your element! Customize the font, and background, create a border, and adjust the space around the element by changing the margin and padding values.


Animate: You can add an animation for your Element. This will appear when the visitor first loads your page and the animation will display as your Element appears on the page.


Duplicate: To quickly add another Element, select the "Duplicate" option in the Element's toolbar.


Pin: You can optionally "Pin" the element to multiple pages to add consistency to the style of your website. 


Go Back

Vimeo Element

Use this Element to insert a Vimeo video into your website content.

To get started, locate your video on Vimeo and copy the URL. Next, you can paste this into the Video URL field in the Vimeo Settings (located via the "Settings" option in the Element Toolbar).


Where to Find


This element can be found in the "ELEMENTS" section of the Toolbar.


Adding to Website


After selecting this Element, you will be able to choose exactly where you want to add it! Simply drag this onto a blue, orange, or purple ribbon that will appear when dragging the Element onto the page.


Options


For more options for your Element, you can visit the following options in the Element Toolbar.


Settings: Paste the full video URL into the Video URL text field. You can also adjust the maximum width that this element will have on larger screens using the Max Width slider.


Element Wrapper: Add some style to your element! Customize the font, background, create a border, and adjust the space around the element by changing the margin and padding values.


Animate: You can add an animation for your Element. This will appear when the visitor first loads your page and the animation will display as your Element appears on the page.


Duplicate: To quickly add another Element, select the "Duplicate" option in the Element's toolbar.


Pin: You can optionally "Pin" the element to multiple pages to add consistency to the style of your website. 


Go Back

20 blog posts